Would like to share how to make seamless authentication in a WebApp in Azure with Managed Identities (System or User assigned one).
This approach won't require passing any password/secrets or certificates to WebApp itself, which is pretty convenient thing.
There are 2 type of identities that possible to use - System Assigned, and User Assigned.
Identities
System Assigned is convenient when you've one or few instances of WebApps, you won't require to create anything extra, but just enable Identity in WebApp settings:
Once enabled Azure will create automatically AAD application - entity which you will be granting permission to other resources from now on (KeyVault, Blob Storages, etc).
Drawback of System Assigned method is that those entities cannot be shared and strictly dedicated for certain WebApp, so if you have many instances of WebApps then you will have to grant permissions for every instance separately.
User Assigned essentially the same thing as System Assigned entity, but you take control of it. First you need to create such entity and give it a name.
Once it's created you need to record its Client ID, will be required later on setup on WebApp side.
You also need to assign this Identity to all WebApps that should have permissions that would be assigned to it. Note that, unlike System Assigned, it can be shared and re-used in several WebApps.
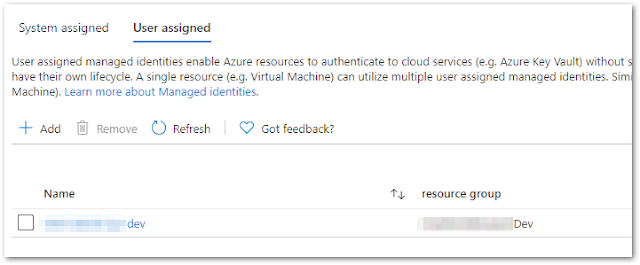
In order to assign it to WebApp go to the same Identity setting section, but select User assigned Identity tab and choose your created identity:

In case you need to use ARM template deployment, here is snippet for
User Assigned identity:
"resources": [
{
"apiVersion": "2018-11-01",
"name": "[parameters('appService_name')]",
"type": "Microsoft.Web/sites",
"kind": "WebApp",
"location": "[parameters('appServicePlan_location')]",
"identity": {
"type": "UserAssigned",
"userAssignedIdentities": {
"[resourceId('Microsoft.ManagedIdentity/userAssignedIdentities', parameters('appService_identityName'))]": {}
}
},
"tags": {
},
"dependsOn": [
],
...
https://gist.github.com/jarig/b6071318a512b3b785e02bcf5796ecbb
where appService_identityName - name of UserAssigned Identity.
For System Assigned it's simpler
"identity": {
"type": "SystemAssigned"
},
...
Full snippets also available here:
https://docs.microsoft.com/en-us/azure/active-directory/managed-identities-azure-resources/qs-configure-template-windows-vm
WebApp Setup
Ok, so now we've identity, next step is to make WebApp to use it. Code changes are pretty simple, first you need to consume such NuGet package - Microsoft.Azure.Services.AppAuthentication, version 1.5.0 or higher.
Now, you can create KeyVaultClient either with System Assigned or User Assigned identities:
In case of User Identity usage important part here is connection string that is passed to AzureServiceTokenProvider constructor. More about
possible connection strings.
You can also initialize KeyVault in Startup.cs:
Get Secrets
Now once you've KeyVaultClient you can easily access any of your secrets, but don't forget to change Access Policies of corresponding KeyVaults and grant your identity appropriate permissions.


No comments:
Post a Comment